Tutorial: Network Address Translation (NAT)

In lessons leading up to this one, we cover private IP addresses, and why these are preferable to use on an in-building network.

However, if any of the users on the private network want to receive packets from the Internet, a public IP address is required.

The question we explore in this lesson is how to enable Internet communications for all users in-building without having to rent a public IP address for every user?

A solution is to use a Network Address Translator (NAT).

Watch the interactive Online Course Lesson or continue reading below.

Network Address Translation (NAT)

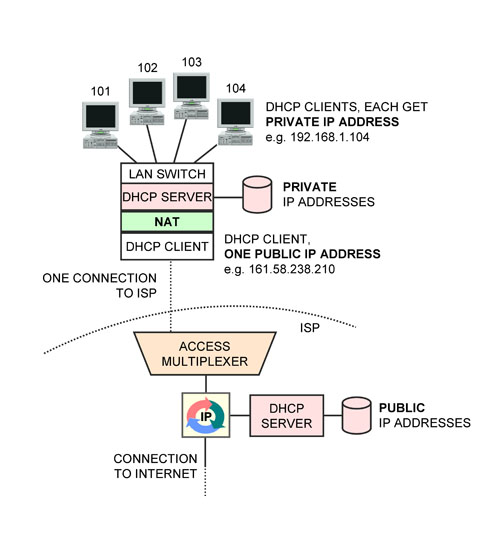
When a computer on the private side initiates communications with a server, it populates the source IP address field in the packet header with its private address and the destination IP address field with the public IP address of the server.

The packet is then transmitted in a MAC frame to the computer’s “default gateway”, which is the Customer Edge router. This device is performing the NAT function.

The NAT changes the source IP address from the private IP address of the sender to the public IP address of the NAT, i.e. the CE router, then transmits the packet in a frame on the public network (the Internet).

The Internet server of course uses the source address in the packet it receives as the destination address to answer back to the client. Therefore, it will send the response back addressed to the NAT.
When the NAT receives the packet, it changes the destination IP address on the packet received from the Internet to the private IP address of the appropriate computer, then transmits the packet in a MAC frame to the computer.

One question that arises is: how does the NAT know what computer on the private network a packet received from the Internet is intended for?

It turns out that the NAT uses the Layer 4 header to keep track of things. The Layer 4 header (TCP or UDP) begins with two octets that are called the “source port” then two octets for the “destination port”. These fields are used to indicate which application on a computer the message is being sent from and to.

The NAT selects an arbitrary “fake” port number to identify a computer on the private network, and records this port number against the private address in a table.

When a packet is transmitted to the Internet, the NAT records the actual source port number then changes the source port value to the “fake” port number.

When the reply from the server is received from the Internet, it has the “fake” port number in the destination port field of the Layer 4 header. The NAT uses this to look up the correct private IP address and correct port number and enter those values in the destination address and destination port number fields, thus relaying the incoming packet to the correct computer on the private network.

NAT provides a number of advantages:

1. A NAT allows multiple computers in-building to share a single Internet address and Internet connection.

2. A NAT provide a truly “always-on” connection to the Internet. Services like DSL and Cable modem described as “always on” are always connected at the Physical Layer. They do not provide “always on” at the Network Layer, since DHCP must be run every time the attached device restarts to get a public IP address.
When a NAT is inserted, it runs DHCP to get the public IP address; so if the NAT is not powered off, the site will always have a public IP address assigned, and thus a connection to the Internet always ready for immediate use.

3. A NAT shields machines from attacks from the Internet. Since a private IP address is not reachable from the Internet, there is no way for a machine on the Internet to initiate communications to a machine on the private network. The only device exposed to the Internet is the NAT. Normally, the NAT is not running on a computer running Windows, so attackers have a greatly diminished chance of finding an vulnerability to exploit compared to connecting a computer running Windows naked onto the Internet.

Devices that perform this function are available in industrial-strength versions from companies like Cisco. Hardware devices to do this are also available for about $20 from companies like Linksys for use on a DSL or cable modem connection. They often include both an Ethernet switch and an 802.11 wireless LAN access point for the private network side. Most ISPs now provide the CE router with NAT function integrated in a device that includes the DSL or Cable modem they supply.

Watch the interactive Online Course Lesson, part of the Certified Telecommunications Network Specialist CTNS Certification Courses.

New Online Course: IP Packet Networks, Addresses and Routers

Online Course L2213: IP Packet Networks, Addresses and Routers

In this course, we concentrate on the fundamentals of IP packet networks, routers and IP addresses.

Packet networks embody two main ideas: bandwidth on demand and packet switching.

First, we’ll recap channelized TDM and its limitations, then understand statistical TDM or bandwidth on demand.

Next, we’ll understand how routers implement the network with packet-switching, that is, relaying packets from one circuit to another, and how routers are a point of control for network security. We’ll introduce the term Customer Edge (CE).

Then we’ll cover the many aspects of IP addressing: IPv4 address classes, dotted decimal notation, static vs. dynamic addresses, DHCP, public vs. private addresses, Network Address Translation, IPv6 overview and finish with IPv6 address allocation and assignment.

1. Module Introduction   watch now (free)
2. Review: Channelized Time-Division Multiplexing (TDM)
3. Statistical Time-Division Multiplexing: Bandwidth-on-Demand
4. Private Network: Bandwidth on Demand + Routing
5. Routers
6. IPv4 Addresses
7. DHCP
8. Public and Private IPv4 Addresses
9. Network Address Translation   watch now (free)  new tutorial!
10. IPv6 Overview
11. IPv6 Address Allocations and Assignment

Overall objective
The objective of this course is to develop a solid understanding of IP. After taking this course, you will be up to speed on the fundamental principles of packet networks: bandwidth on demand, also known as overbooking or oversubscription, and packet forwarding. You will know the IP packet format and how IP addresses are allocated, assigned and displayed. You will know the difference between static and dynamic addresses, public and private addresses and how Network Address Translation works. An additional objective is to become familiar with the basics of IPv6.

Learning Objectives
Upon completion of this course, you will be able to explain:

  • The concept of statistical multiplexing, also known as oversubscription, overbooking and bandwidth on demand, why and how it can be implemented and its benefits.
  • What a private network is
  • What a router is and how it implements the network by connecting data links
  • How routers move packets between broadcast domains, including VLANs
  • How routers also act as a point of control for traffic, called packet filtering
  • The basic structure and contents of a routing table
  • The Customer Edge
  • IPv4 address blocks: Class A, Class B and Class C, and dotted-decimal notation
  • Static addresses and dynamic addresses, and how and why DHCP is used to assign both
  • Public addresses and private addresses, how, why and where each is used
  • Network Address Translation for interfacing domains where public addresses are used with those where private addresses are used
  • The improvements and changes between IPv4 and IPv6, and
  • The types of IPv6 addresses, how IPv6 addresses are allocated to ISPs then assigned to users, and how each residence gets 18 billion billion IPv6 addresses.

List of Lessons

Lesson 1. Course Introduction (this one).

Lesson 2. Review: Channelized Time-Division Multiplexing (TDM)
We’ll review the idea of channelized Time-Division Multiplexing, what channels are, and how they can be used to aggregate traffic onto a high-speed circuit. Then we’ll raise some questions: is that an efficient way to connect devices that produce traffic in bursts, which means devices that are normally doing nothing? And what about the problem of a single point of failure for all the aggregated traffic? Subsequent lessons explore the answers to those questions.

Lesson 3. Statistical TDM: Bandwidth-on-Demand.
In this lesson, we’ll understand how circuits that move bits constantly can be used efficiently when the user’s traffic profile is: “idle most of the time, interspersed with bursts of data every once in a while.” The answer is overbooking. This is also called statistical multiplexing and bandwidth-on-demand, and is a key part of a packet network: the internal circuits are heavily overbooked, to give users the highest speed at the lowest cost. It is necessary to know the users’ historical demand statistics – also called their traffic profile – to know how much to overbook, hence the term statistical multiplexing.

Lesson 4. Private Network: Bandwidth on Demand + Routing.
The purpose of this lesson is to expand the discussion of the previous lesson to include multiple circuits. The result is called a private network, and is the simplest framework for understanding routers, routing, network addresses and bandwidth-on-demand.

Lesson 5. Routers
In this lesson, we’ll take a closer look at a router, more precisely identifying the functions a router performs to implement a packet network, and understand how a router routes by examining the basic structure and content of a routing table. We’ll also understand how the router can act as a point of control, denying communications based on criteria including network address and port number, why this is implemented and its limitations. The term Customer Edge (CE) is defined in this lesson.

Lesson 6. IPv4 Addresses
Here, we’ll understand IPv4 addresses, address classes and the dotted-decimal notation used to represent them.

Lesson 7. DHCP
In this lesson, we’ll cover DHCP: the Dynamic Host Configuration Protocol, and understand the mechanism by which a machine is assigned an IP address. We’ll also understand how the “dynamic” host configuration protocol can be used to assign static addresses to machines and the advantages of this method.

Lesson 8. Public and Private IPv4 Addresses
The purpose of this lesson is to define the terms “public” and “private” IP address, review how IP addresses are assigned and the costs for those addresses, then cover the ranges of IPv4 addresses that are used as private addresses, and understand how and why they are used.

Lesson 9. Network Address Translation
In this lesson, we’ll explore how private IPv4 addresses used in-building and a public address required for Internet communications can be joined together with a software function called Network Address Translation.

Lesson 10. IPv6 Overview
Completing this course on IP, we’ll first review the next generation of IP: IPv6, understand the improvements compared to IPv4 and review the format of the IPv6 packet and its header.

Lesson 11. IPv6 Address Allocations and Assignment
Finally, we examine the structure of the 128-bit IPv6 address, review the different kinds of IP addresses, the organizations that allocate them, and the current plans for how addresses will be assigned to end users… and how every residence gets 18 billion billion IPv6 addresses.