
The Internet connection at your office dies. Lights on your modem are flashing in a strange pattern. You call the ISP, and they quickly diagnose that the modem power supply has failed, and they will overnight you a replacement. Presumably you are not the first person to have this problem with that modem.
So how do you continue to operate while you are waiting for the replacement power supply? It’s hard to run your business without e-mail and ordering and administration systems, which are all accessed via the Internet.
If you want availability, you need two connections to the Internet, so if one fails you are not out of business. We go over this in the lesson “Mature Competitive Carrier Network: Regional Rings, POPs and MANs”, slide 3.17 of Course 101, Telecom Datacom and Networking for Non-Engineers, and mention it in pretty much every other course.
A large business will be a station on a Metropolitan Area Network, which is a ring, meaning two connections to the Internet for that business and automatic reconfiguration in the case of one failing. But this is expensive… the second connection is not free.
Small and medium businesses usually have a single DSL or cable modem connection to the Internet. When that fails, connectivity to email, ordering and administration servers is impossible, and many businesses these days would be “dead in the water” until the ISP fixes the problem with their hardware.
Unless you have an Android smartphone, a good “data” plan and a laptop with WiFi running Windows.
The scenario described happened at our office last week. Since many of our customers might find themselves in a similar situation – even at home – I thought I’d share the quick and painless solution I came up with. Even if you’re not likely to need this solution, understanding how it works will no doubt sharpen your understanding of the devices involved and their functions.
In this tutorial, I will use the technology in our office: 50 Mb/s DSL, Android smartphone and Windows laptop. The solution is equally applicable to an Internet connection using a cable modem or if you are one of the lucky few, an Internet connection via fiber.
For the smartphone and laptop, there may be equivalent functions on Apple products, but as I am allergic to Apples, we don’t have any in the office. I’m posting this tutorial on our our Facebook page, our GoogleMyBusiness page, or our blog; I invite someone better able to tolerate Apple products to leave a comment whether and how the iPhone and MacBook can perform the required functions.
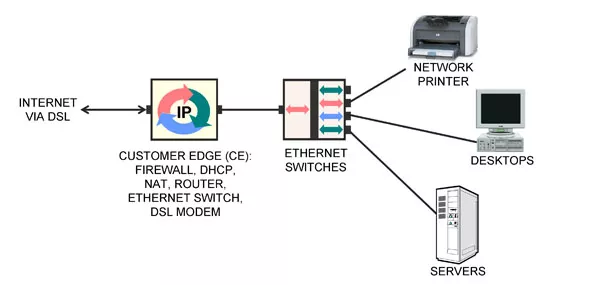
The diagram above illustrates the normal network setup in our office, a typical configuration for networking at a small or medium business. On the left is the access circuit to the Internet Service Provider (ISP), terminating on a modem in our office.
The modem is contained in a box that also includes a computer and an Ethernet switch. This box is more properly called the Customer Edge (CE). The computer in the CE runs many different computer programs performing various functions: Stateful Packet Inspection firewall, DHCP server offering private IP addresses to the computers in-building, DHCP client obtaining a public IP address from the ISP, a Network Address Translation function between the two, routing, port forwarding and more.
In-building is a collection of desktop computers, servers and network printers. These are connected with Category 5e LAN cables to Gigabit Ethernet LAN switches, one of which is also connected to the CE.
When a desktop computer is restarted, its DHCP client obtains a private IP address and Domain Name Server (DNS) address from the DHCP server in the CE. The private address of the CE is configured as the “default gateway” for the desktop by Windows.
When a desktop computer wants to communicate with a server over the Internet, it looks up the server’s numeric IP address via the DNS, then creates a packet from the desktop to the Internet server and transmits it to its default gateway, the CE. The NAT function in the CE changes the addresses on the packet to be from the CE to the Internet server and forwards the packet to the ISP via the modem and access circuit. The response from the Internet server is relayed to the CE, where the NAT changes the destination address on the return packet to be the desktop’s private address and relays it to the desktop.
The solution for restoring Internet access after the CE died is illustrated below.
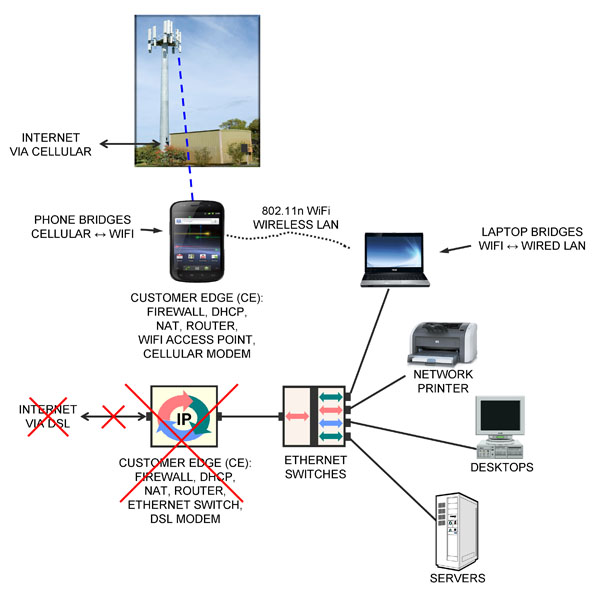
An Android smartphone and a laptop running Windows were used to restore connectivity to the Internet without making any changes to the desktops, servers or network printers.
First, I took my Samsung/Google Nexus smartphone running Android out of my pocket and plugged in the charger. Then on its menu under Settings > more > Tethering & portable hotspot > Set up Wi-Fi hotspot, I entered a Network SSID (“TERACOM”) and a password, clicked Save, then clicked Portable Wi-Fi hotspot to turn it on. The smartphone is now acting as a wireless LAN Access Point, just like any other WiFi AP at Starbucks, in the airport or in your home.
At this point, the smartphone is the CE device, performing all of the same functions that the DSL CE device had been before it died: firewall, DHCP client to get a public IP address from the ISP (now via cellular), DHCP server to assign private IP addresses to any clients that wanted to connect (now via WiFi), NAT to translate between the two and router to forward packets.
Just as the DSL CE equipment “bridged” or connected the DSL modem on the ISP side to the Ethernet LAN in-building, allowing all the devices on the LAN to send and receive packets to/from the Internet via DSL, the smartphone “bridges” or connects the cellular modem on the ISP side to the WiFi wireless Ethernet LAN in-building, allowing all the devices on the wireless LAN to send and receive packets to/from the Internet via cellular radio.
The remaining problem was that none of the desktops or servers had wireless LAN cards in them, so they could not connect to the smartphone AP and hence the smartphone’s cellular Internet connection.
What was needed was a device to “bridge” or connect the wired LAN to the wireless LAN in-building. By definition, this device would need two LAN interfaces: a physical Ethernet jack to plug into the wired LAN, plus a wireless LAN capability. Looking around the office, I spotted two devices that fit this description. One of them was my laptop, with both a LAN jack and wireless LAN.
I fired up the laptop, plugged it into an Ethernet switch with a LAN cable, and in the Network and Sharing Center, clicked Change Adapter Settings to get to the Network Connections screen that showed the two LAN interfaces.
I enabled both the wired and wireless LAN interfaces. Then right-clicking the Wireless Network Connection icon, selected the TERACOM wireless network and entered the password.
Once that was successfully connected, I selected the two adapters in the Network Connections screen, right-clicked and chose “Bridge Connections”. A message saying “Please wait while Windows bridges the connections” appeared, then an icon called “Network Bridge” appeared, and after a few seconds, “TERACOM” appeared as well.
My laptop was now acting as an Ethernet switch, connecting the wired LAN to the smartphone’s wireless LAN.
Each of the desktops, servers and network printers in the office had to be rebooted so they would run their DHCP client again, obtaining a private IP address and DNS address from the smartphone AP, and be configured so the smartphone was the “default gateway” in Windows.
After rebooting my desktop computer, it had Internet access over the wired LAN, through the wired Ethernet switch to my laptop, to the smartphone via WiFi then to the ISP over cellular. After rebooting the other desktops and servers, all had Internet access again, with no changes to the configuration of the desktops or servers.
This took about 20 minutes to get up and running, and we were back in business. Running a bandwidth test on speedtest.net, I found we had exactly 5 Mb/s connection to the Internet via cellular. Obviously my cellular service provider limited the connection to 5 Mb/s in software – but who’s complaining? 5 Mb/s is more than three times as fast as a T1, which cost $20,000 per month when I first started in this business 20 years ago.
I hope you found this tutorial useful, either as a template for your own emergency backup Internet connection, or simply as a way of better understanding the devices, their functions and relationships.
— EC
Note 1: You must verify your billing plan for “data” on your cellular contract before doing this. I have 40 GB included, which means basically unlimited, and that includes the WiFi hotspot traffic. Make sure you have something similar, to avoid receiving a bill for $10,000 for casual “data” usage.
Note 2: As always, this tutorial is provided as general background information only. We do not guarantee it will work for you. Each situation is unique and requires professional advice to identify and resolve issues including but not limited to performance and security. This tutorial is not professional advice. But I hope you have found it valuable.
Note 3: I might have been able to implement this without the laptop. If you’d like to know that, or what was the other device I could have used to bridge the wired and wireless LAN in-building, or suggest how this could be done with Apple products, please leave a comment on our Facebook page, our GoogleMyBusiness page, or our blog.