Development #4: A Worldwide Standard for Mobile Wireless

A closer look at the fourth item in our list of eight major recent developments and trends in telecom.

Telecommunications technology is constantly changing and improving – seemingly faster and faster every year – and at Teracom, we keep our training courses up to date to reflect these changes. In a previous post, we identified eight major developments and trends in telecommunications incorporated in our training.

In this post, we take a closer look at the fourth development:
a worldwide standard for mobile wireless has finally been achieved with 4G LTE.


Mobility means it is possible to start communicating with a particular radio base station, then when moving physically away, be handed off to another base station down the road to continue communications uninterrupted. In a non-mobile system (like WiFi), communication ceases if you move too far away.

The first generation (1G) of mobile radio was characterized by analog FM on frequency channels. Numerous incompatible systems were deployed: AMPS in North America, TACS in the UK, NMT in Finland and others.

The second generation (2G) was digital, which means modems communicating 1s and 0s between the handset and base station. Again, several incompatible systems were deployed, and two warring factions emerged, which could be called the “GSM/TDMA faction”, and the “CDMA faction”.

By far, the most popular 2G system was GSM, a European technology where a number of users time-share a single radio channel. Another system was IS-136, called “TDMA” in North America, deployed by the company currently known as AT&T Wireless in the US and Rogers in Canada.

A less popular 2G system employed CDMA, using technology patented by American company Qualcomm, and deployed by Verizon, Sprint and Canadian telephone companies.

These 2G systems were totally incompatible. A basic phone from a carrier could not work on another carrier unless they both used exactly the same system.

To try to avoid a repeat of the incompatibility for the third generation, the International Telecommunications Union (ITU) struck a standards committee in year 2000 called IMT-2000, its mission to define a world standard for 3G.

They failed. IMT-2000 instead published a 3G “standard” with five incompatible variations. The two serious variations were both CDMA – but differed on the width of the radio bands, the control infrastructure and synchronization method among other things.

The GSM/TDMA faction favored the deployment of CDMA in a 5 MHz wide band. This was called IMT-DS, Direct Spread, Wideband CDMA and Universal Mobile Telephone Service (UMTS). Its data-optimized version was called HSPA.

The CDMA faction favored a strategy that was a basically a software upgrade from 2G, employing existing 1.25 MHz radio carriers. This is called IMT-MC, CDMA multi-carrier, CDMA2000 and 1X. Its data-optimized version was called 1XEV-DO.

Again, these 3G systems were completely incompatible. A basic UMTS phone could not work on a 1X network.

Market forces finally pushed the two camps together.

The fact that there were far more users in the GSM/TDMA faction meant that their phones were less expensive, had better features and appeared on the market first. This put the carriers in the CDMA/1X faction at a disadvantage. This trend was continuing into 3G, where UMTS phones would have the same advantage over 1X phones.

Then, Steve Jobs invented the world’s most popular consumer electronic product, the iPhone – but only permitted carriers in the GSM/TDMA/UMTS faction to have it. This severely tilted the playing field.

In the face of this, the CDMA/1X faction threw in the towel, and decided to go with the GSM/TDMA/UMTS faction’s proposal for the fourth generation (4G), called LTE, to level the playing field.

And once this was agreed, Steve Jobs allowed the iPhone on all networks. One of the legacies of Steve Jobs will not just be the iPhone, but ending the standards wars by pushing the industry to agree on LTE as a single worldwide standard for mobile communications as of the fourth generation, using the leverage of his iPhone.


I hope you’ve found this article useful!

If you like, you can watch a video segment of our instructor explaining why LTE became a worldwide standard on youTube

Additional explanation of cellular concepts, TDMA, CDMA and LTE is available in:
Teracom online tutorials
Course 101: Telecom, Datacom and Networking
for Non-Engineering Professionals

Textbook T4210
Telecom, Datacom and Networking
for Non-Engineer
s

Online Course 2206 Wireless Telecommunications
(part of the CTNS certification coursework)
Online Course 2232 Mobile Communications
(part of the CWA certification coursework), and
DVD Course V6 “Wireless”

Tutorial: Bluetooth

This tutorial on Bluetooth is Lesson 2: Bluetooth, from Course 2233 “Fixed Wireless”.  Watch the lesson by clicking the picture below.
You can also watch the video on YouTube.
The text is from the Course book / CWA certification study guide.

Enjoy!

Young man illustrating Bluetooth channel as frequency-hopping pattern using a pogo stick. Click the image to watch the full lesson. The text that follows is from the course book.
Young man illustrating Bluetooth channel as frequency-hopping pattern using a pogo stick.
Click the image to watch the full lesson. The text that follows is from the course book.

Bluetooth is a set of standards for short-range digital radio communication published by a consortium of companies called the Special Interest Group. It was originally developed as a wireless link to replace cables connecting computers and communications equipment.

Bluetooth connections are called piconets and Personal Area Networks since (in theory) up to eight devices can communicate on a channel within a range of 1 to 100 meters depending on the power.

In reality, Bluetooth is mostly used point-to-point with ten meters range.

The first data rate for Bluetooth was 0.7 Mb/s, followed by an enhancement to “3” Mb/s (2.1 Mb/s in practice). A High Speed variation employs collocated Wi-Fi for short high-bitrate transmissions at 24 Mb/s. The Smart or Low Energy variation allows coin-sized batteries on devices like heart-rate monitors.

Bluetooth applications

Applications include wireless keyboard, mouse and modem connections… though today, 2 Mb/s Bluetooth is likely slower than the modem.

Bluetooth is used to replace wires connecting a phone to an earpiece, or to an automobile sound system for hands-free phone calls while driving. In this case, both two-way audio and two-way control messages are transmitted.

Bluetooth is also used to stream music from a smartphone to a receiver connected to an amplifier and speakers in an automobile or in a living room.

In the future, wireless collection of readings from devices like heart-rate monitors will be widespread.

Each of these types of applications corresponds to a Bluetooth profile, which is a specified set of capabilities and protocols the devices must support.

Bluetooth implements frequency-hopping, where the devices communicate at one of 79 carriers spaced at 1 MHz in the 2.4 GHz unlicensed band for 625 microseconds (µs), then hop to a different carrier for 625 µs, then to another, in a repeating pattern known to both devices. A particular hop sequence is called a channel, and is identified by an access code.

This is called Frequency-Hopping Spread Spectrum (FHSS), since hopping between 79 carriers spreads energy across spectrum 79 times wider than one carrier. It has the advantage of reduced sensitivity to noise or fading at any particular carrier.

If different pairs of devices are using different hop sequences, they can communicate at the same time in the same place without interfering. There are security advantages if the hop sequence can not be determined by a third party.

The initiator of communications is called the master. It determines the frequency hopping pattern, when the pattern begins, when a packet begins and when a bit begins. The packet and bit timing is based on the master’s clock, which ticks every 312.5 microseconds. Two ticks make a slot. A slot corresponds to a hop. The master transmits and the slave listens in even-numbered slots; vice-versa in odd-numbered slots.

To establish the channel, the master derives a channel access code from its Bluetooth address, and indicates the code to the slave at the beginning of every packet. Both master and slave use this to determine the actual frequency-hopping sequence.

Data is organized into Bluetooth packets for transmission. Packets can be 1, 3 or 5 slots long. A bit rate of 2 Mb/s would mean Bluetooth packets are about 150, 450 or 750 bytes long.

Discovering other devices means sending requests in packets on pre-defined channels called inquiry scan channels. Making a device discoverable means it listens on the inquiry channels, and responds to inquiries with information like its Bluetooth address, name and capabilities. This results in a list of Bluetooth devices displayed on the discovering device, such as a smartphone.

Connecting to a device means paging the device on its paging channel, a channel with access code derived from the target’s Bluetooth address. Devices listen on their paging channel, and respond to pages to establish a session. Once the session setup protocol is completed on the paging channel, the devices begin communicating on the channel defined by the master.

The frequency hopping pattern can be adapted to skip carriers where the signal to noise ratio is permanently low, to improve overall performance.

I hope you’ve enjoyed this tutorial!

This discussion is covered in the following Teracom training courses:
• DVD-Video Course V6: Understanding Wireless
https://www.teracomtraining.com/video_courses.htm

• Online Course 2233 Fixed Wireless
https://www.teracomtraining.com/online-courses-certification/certified-wireless-analyst-cwa.htm#2233

CWA course books released – and the first one is FREE!

The course books for the three Certified Wireless Analyst courses are now available on Google Play Books!

Course 2231: Wireless Fundamentals Course Book  – FREE
Course 2232: Mobile Communications Course Book – US$9.99
Course 2233: Fixed Wireless Course Book – US$5

We’re using Google Play Books because it allows you to read the book on any device: desktop, laptop, tablet, phone, PC, Mac, iPad, android… which is way more flexible than iTunes or other platforms.

The books are formatted the same way as Teracom instructor-led course and DVD course books, with detailed text notes on the left page and the corresponding graphics / bullets page on the right in two-page view.

To get you started, the course book for Course 2231: Wireless Fundamentals is free, downloadable and printable!

To download and print the the course book for Course 2231: Wireless Fundamentals, first add the book to your library (it’s FREE), then on the My Books page, click the three dots and choose “Download PDF” as shown in the screenshot below.

If you print the PDF two-sided then put it in a 3-ring binder, the result will be almost identical to the course books supplied with Teracom instructor-led and DVD courses!

Cheers!
Printable course book

Printable course book

New TCO Certification Package: Certified Wireless Analyst (CWA)

The Certified Wireless Analyst (CWA) Certification Package is released!

CWA includes three training courses covering the full range of wireless technologies, giving you the broad knowledge base required of an analyst in the wireless business — plus certification to prove it.

Learn the fundamentals, jargon and buzzwords, principles of operation and ideas behind today’s wireless.

You get three high-quality courses with our entertaining instructor, graphics and bullets, plus your certification:

Course 2231: Wireless Fundamentals
• Radio fundamentals. Radio spectrum.
• Digital radio: modems and modulation

Course 2232: Mobile Communications
• Cellular principles. Mobility and handoffs.
• Digital voice. Mobile Internet Access.
• The generations: 1G, 2G, 3G, 4G
• The technologies: FDMA, TDMA, CDMA and OFDM
• The systems: GSM, 1X, UMTS, HSPA and LTE

Course 2233: Fixed Wireless
• Wireless LANs, 802.11 standards, WiFi, security
• Bluetooth, WiMAX, point-to-point and satellites

Upgrade your skills – and your résumé – with this training and certification today.

Guaranteed To Pass with the Unlimited Plan!


Quality You Can Trust
Benefit from decades of knowledge, insight and experience distilled into clear lessons, logically organized to build one concept on another… in plain English.

Join our thousands of satisfied customers including:
AT&T, Verizon, Bell Canada, Intel, Microsoft, Cisco, Qualcomm, NSA, CIA, FAA, US Army, Navy, Marines and Air Force, Coast Guard, CIA, IRS, CRA, CRTC, RCMP, banks, power companies, police forces, manufacturers, government, local and regional telcos, broadband and fiber carriers and thousands of individuals.

gsa contract holder - assurance of quality
Teracom is a supplier of this training to the US Government under GSA contract GS-02F-0053X. Obtaining this Federal Supply Schedule contract involved a two-year-long process of evaluation including a customer quality rating where we scored 97%!

money-back guarantee
30-day, 100%, no questions asked money back guarantee.
If for any reason you change your mind during the 30 days after purchase, you can get your money back.
You have nothing to lose – and a marketable knowledge skill to gain! Get started now!


telecommunications certification organization (TCO)

About TCO Certification
Teracom is a Gold Training Partner of the Telecommunications Certification Organization, authorized to administer exams for TCO certifications on the myTeracom Learning Management System and award TCO certifications.

TCO certification is proof of your knowledge of telecom, datacom and networking fundamentals, jargon, buzzwords, technologies and solutions.

It’s backed up with a Certificate suitable for framing, plus – a Teracom exclusive – a personalized Letter of Reference / Letter of Introduction detailing the knowledge your certification represents and inviting the recipient to contact us for verification.

You may list Teracom Training Institute as a reference on your résumé if desired.

Benefits of Certification for Individuals
TCO Certification differentiates you from the rest of the crowd when applying for a job or angling for a promotion.

The knowledge you gain taking these high-quality courses, confirmed with TCO Certification, is foundational knowledge in radio and wireless: fundamental concepts, mainstream technologies, jargon, buzzwords, the underlying ideas – and how it all fits together.

This type of knowledge and preparation makes you an ideal candidate to hire or promote to a task, as you will be able to build on your knowledge base to quickly get up to speed and work on a particular project – then have the versatility to work on subsequent projects.

TCO Certification will help demonstrate you have this skill… a desirable thought to have in your potential manager’s mind.

Benefits of Certification for Employers
Take advantage of these courses for individual learning, a team, or for an entire organization. The scalable myTeracom Learning Management System can register and manage all of your people through their courses, lessons and exams, and generates reports showing progress and scores.

For larger organizations, the courses and exams can also be licensed and deployed on an organization’s internal LMS.

Teracom certification packages are an extremely cost-effective way of implementing consistent, comprehensive telecommunications and networking technology fundamentals training, ensuring that existing resources and new hires are all up to the same speed, with a common vocabulary, framework and knowledge base.

Get started today with this invaluable addition to your knowledge and skills!


Detailed Course Outlines

Course 2231 Wireless Fundamentals is the first course in the CWA Certification Package. We begin with the fundamentals: what radio is, how it’s organized and how and it’s used to communicate information. Since most systems are digital, we spend time understanding how modems represent 1s and 0s on radio, and explain jargon like QAM and QPSK. We finish with penetration and fading.
A. Radio
B. Wireless Spectrum and Radio Bands
C. Analog Radio
D. Digital Radio: How Modems Work
E. Propagation, Penetration and Fading

Course 2232 Mobile Communications is the second course in the CWA Certification Package. With a good foundation in place, we’ll cover mobile communications from A to Z: cellular principles, digital voice, data over cellular, mobile Internet access, the technologies: FDMA, TDMA, CDMA and OFDM, and the generations: 2G GSM, 3G 1X, UMTS and HSPA and 4G LTE. This is where the money is!
A. Mobile Network Components and Operation
B. Cellular
C. 1G: Analog Frequency-Division Multiple Access
D. Second Generation: Digital Cellular
E. Digital Cellular: Voice Communications
F. Internet Access via Cellular: “Data” Communications
G. 2G TDMA (IS-136): Time-Division Multiple Access
H. 2G TDMA (GSM): Time-Division Multiple Access
I. 2G CDMA: Code-Division Multiple Access
J. Spread Spectrum
K. CDMA Operation and Patents
L. 3G: CDMA 1X and UMTS
M. 4G: LTE
N. 4G: OFDM
O. Dynamic Assignment of Subcarriers
P. Spectrum-Sharing Roundup: FDMA, TDMA, CDMA, OFDM

Course 2233 Fixed Wireless is the third and final course in the CWA Certification Package. We’ll round out your knowledge with fixed wireless: WiFi, 802.11, WiFi security, Bluetooth, WiMAX, point-to-point microwave and satellites.
A. Infrared
B. Bluetooth
C. WiFi: Wireless LANs
D. WiFi Security and WPA2
E. 802.16 WiMAX
F. Point-to-Point Microwave
G. Satellite

printable brochure

What You Get With The CWA Certification Package

1. High-quality, up-to-date, comprehensive training
You will get a solid foundation of structured knowledge. Understand the fundamentals, technologies, jargon and buzzwords… and how it all fits together

2. The certification exam
Each course in the certification package has an associated exam, typically ten multiple-choice questions.  You get unlimited repeats of the exam – which means guaranteed to pass.
Plus, on achieving a passing grade:

3. Your certificate, suitable for framing
A full-color TCO Certificate suitable for framing is automatically awarded by the Learning Management System on completion of the required exams.
It can be immediately printed on plain or textured paper on any color printer and framed by student as desired, with no shipping charges. It can also be attached to the electronic version of the student’s CV. An original hard copy of your Certificate, signed and sealed, can be sent to you by mail for $25 plus first-class mail cost.

4. A personalized Letter of Reference / Letter of Introduction
You also receive a personalized Letter of Reference / Letter of Introduction explaining the courses you took and the knowledge you have, and inviting anyone you give it to to contact us as a reference… excellent addition to your CV.

5. Right to display the TCO logo
You’ll have the right to display a high-resolution copy of the TCO logo on your résumé, business card, LinkedIn profile, web page, blog, or email signature.

6. TCO Certification Designation
Passing the Certified Wireless Analyst, you will be able to state that you:
– “are a Certified Wireless Analyst”,
– “hold a Certified Wireless Analyst certification from the Telecommunications Certification Organization”,
– are “certified as a Wireless Analyst by the Telecommunications Certification Organization”,
– are a “Telecommunications Certification Organization (TCO) Certified Wireless Analyst”,
– are “TCO-certified”,
and may sign your name
– “Richard Smith, CWA,” or “Jane Smith, Certified Wireless Analyst”

7. A 30-day no-questions-asked 100% money-back guarantee.
If for any reason you change your mind, for 30 days after purchase you can get your money back.

You have nothing to lose! – and a marketable skill to gain!

get started now!

Invest in yourself! Upgrade your résumé with this essential core knowledge.

How to implement a WiFi range extender for $20

A volunteer project to set up WiFi in a 150-year-old building with stone walls that I did recently required repeaters, also known as range extenders.

I ended up writing detailed instructions to get a popular WiFi access point / router on Amazon working as a repeater… and thought you might find this useful to extend WiFi coverage in your home or small office.

teracom-tutorial-wifi-repeater

Even if you don’t need to extend your WiFi coverage, understanding the configuration, including the IP addresses, DHCP, subnets and all the other items covered in this tutorial is career-enhancing knowledge.

The IP addressing story including DHCP is covered in
Online Course 2213 “IP Networks, Routers and Addresses”
(part of the CTNS Certification Package), as well as

Instructor-Led Course 101, the Telecom, Datacom and Networking for Non-Engineers textbook, and DVD-Video Course V4 Understanding Networking 1.

The requirement was to provide WiFi coverage in a 150-year old building with thick stone walls. The Internet connection (DSL) was in the basement, and coverage was required to the fourth floor.

We initially looked at pulling a cable to the fourth floor, but the stone walls made wireless a no-brainer.

The WiFi signal produced by the ISP’s Customer Edge device, which contains the DSL modem, a router, switch and WiFi Access Point, did not reach very far.

So WiFi repeaters, sometimes called Range extenders would be required. This had to be implemented with encryption of data over the air for information security.

Special-purpose range extenders can cost $300 each. After a bit of research, I bought these $20 units on Amazon.

They support “300 Mb/s” 802.11n, and most importantly, implement the Wireless Distribution Service (WDS) with WPA2 airlink encryption, which is needed for the repeater function with security.

Here is the product link on Amazon.   I don’t get a commission.

The instructions weren’t very complete, so I looked at the product’s Q&A section on Amazon and found instructions.
But those instructions turned out to be not quite right. And being an Engineer, I couldn’t help but proposing correct instructions…

These instructions assume you are connecting the WiFi access point / router pictured, TP-LINK model TL-WR841N, to any WiFi with a working Internet connection.

teracom-tutorial-wifi-repeater

Abbreviations:
[example] = example values used during my setup.
Yours might be a bit different.
SOURCE-AP = the access point / router generating the wireless signal you want to repeat. This is often supplied by your ISP.
REPEATER-AP = the access point / router repeating the wireless signal, the one that we are setting up.
SOURCE-NET = the SSID (network name) of the wireless signal you want to repeat.
REPEATER-NET = the SSID (network name) of the repeated wireless signal.
GUI = Graphical User Interface.
This is the access point / router’s control panel.

Before starting, gather the following information:
– The LAN/wireless side IP address of the SOURCE-AP GUI. [192.168.3.1]
– The username and password for the SOURCE-AP GUI.
[admin, admin]
– The subnet the SOURCE-AP is using on the LAN/wireless side. [192.168.3.x]
– The SOURCE-NET name [GROUND]
– The encryption type and password [WPA-2 PERSONAL, xxxx]
– The channel the wireless signal to be repeated is on. [3]

If you don’t know the channel, you can find out during the setup below. However, it is preferable to log in to the SOURCE-AP GUI and set the channel to 3 instead of “auto” so it does not change, and uses an unpopular channel likely to have less interference.

To determine the LAN/wireless IP address and subnet of the SOURCE-AP, look at the IP address and default gateway of a device directly connected to the SOURCE-AP. (Open the Network connections folder, click change adapter settings, and view status and then details in Windows). The value in the default gateway field is the IP address of the SOURCE-AP GUI. The part of the address common to the default gateway and the device is the subnet ID.

Do this setup and get it working somewhere comfortable near the SOURCE-AP. Once it’s working, you can place the repeater anywhere near an electrical outlet.

Here we go:

1. Plug the power into the REPEATER-AP. If any settings have already been changed on the device, press and hold the reset button on the back for ten seconds until all lights are illuminated to indicate reset happening. Reset is not necessary if the unit is fresh out of the box.

2. Plug a PC into a LAN port on the REPEATER-AP with the supplied LAN patch cable. I used my laptop. Make sure the LAN adapter is set to get an IP address automatically. (Open the Network connections folder, click change adapter settings, and view properties in Windows). Make sure the LAN adapter is the only one enabled. Disable the wireless adapter.

3. Open a browser and go to http://tplinklogin.net . This gets you to the GUI of REPEATER-AP, initially 192.168.0.1. The default username, password is admin, admin. Don’t do the quick setup.

4. Click “Wireless” on the left column menu.
On the Wireless Settings page that appears:
a. Under the dropdown list for “Channel”, select the channel the wireless signal to be repeated is on. [3] If you don’t know, skip this step and the unit will force you to select the correct one after the “Survey” step below.
b. Click the “Enable WDS bridging” checkbox.
c. Click “Survey”. A list of SSIDs appears. Click “connect” on the one that is SOURCE-NET. [GROUND] All of the fields are automatically populated except for the password.
d. Enter the password and click Save. Wait ten seconds for the processing to finish.
e. At the top of the page beside Wireless Network Name, enter a name for REPEATER-NET [R1] and click Save.

5. Click “Wireless Security” on the left column menu. Select Personal WPA2-PSK, AES encryption and enter a password for REPEATER-NET.

6. Click “DHCP” on the left column menu. Click the DHCP disable radio button. Click Save. Ignore the reboot warning.

7. Click “Network” on the left column menu.

8. Click LAN. Change the IP address to one in the SOURCE-AP subnet that is not being used by any other device and click Save [192.168.3.200]. A reboot warning will appear. Click OK and let the unit reboot.

9. The address in the browser will magically change to the IP address you entered in the previous step. This is the new IP address for the GUI on REPEATER-AP. You will be prompted to log in again. The status screen will appear. Under Network, click the WAN MAC menu item on the left.

You should also now have Internet through REPEATER-AP!
Open  news.google.com in a new tab in your browser to verify.
Wireless devices can now connect to REPEATER-NET.
Wired devices can connect to REPEATER- AP.
Both get Internet access through SOURCE-AP.
Ain’t life grand?

10. To avoid problems with dynamic addresses and timeouts, make the IP address of REPEATER-AP static.
Open a new tab in your browser. Enter the address of the SOURCE-AP GUI [192.168.3.1] and log in. Find the screen that lets you assign static IP addresses. The SOURCE-AP could be any brand of device; it is often supplied by your ISP. The function might be called “DHCP reservations” or “IP address reservation”. Make a new entry, with the WAN MAC address displayed in the REPEATER-AP GUI and the REPEATER-AP IP address you entered in Step 8.

I actually set up a chain of four of these units to provide wireless coverage from the basement to the fourth floor of a 150-year-old building with stone walls.  And it worked!

Good luck!

P.S. Don’t forget to go back in to REPEATER-AP and change the password. The menu item is hiding under System Tools on the left.


Notice required by the legal department: This information is provided as general background information only. Design and implementation of a communication system requires professional advice to identify and resolve issues specific to that particular system, including but not limited to performance, availability and security issues. Additionally, while we have strived to be as accurate as possible, we make no representation or warranty that the information provided is 100% accurate. This information is not to be relied upon as professional advice, nor is it to be used as the basis of a design. Users of this information agree to hold the author and Teracom Training Institute Ltd. harmless from any liability or damages. Acceptance and use of this information shall constitute indication of your agreement to these conditions.

DVD6: Wireless Released! Free lesson, introduction, launch specials!

We’re very pleased to announce the release of our latest DVD-Video Course DVD6 Wireless: totally new, over 3 hours long with 28 lessons and a 74-page course book and certificate.

You will gain a real understanding of how digital radio communications works, how a cellular network operates, the cellular technologies and generations, plus WiFi, Bluetooth, satellite and much more.

Take advantage of the launch specials to get this career- and productivity-enhancing knowledge upgrade today: https://www.teracomtraining.com/specials.htm#dvd6

DVD6: Wireless introduction and highlights

Free lesson 2.03 Mobile Network Components and Operation

Teracom DVD-Video Course DVD6: Wireless
ISBN 9781894887083 Length 185 minutes. 74-page course book.

Radio Fundamentals • Spectrum • Digital Radio • Mobile Network Components and Operation • Cellular Principles • Digital Voice • Data • Mobile Internet • Cellular Technologies • TDMA • CDMA • OFDM • Generations • 2G GSM • 3G 1X • UMTS • HSPA • 4G LTE • Fixed Wireless • Bluetooth • WiFi • WiFi Security • Encryption • WiMAX • Point-to-Point Microwave • Satellite

detailed course outline

New Tutorial: Wireless Spectrum and Radio Bands

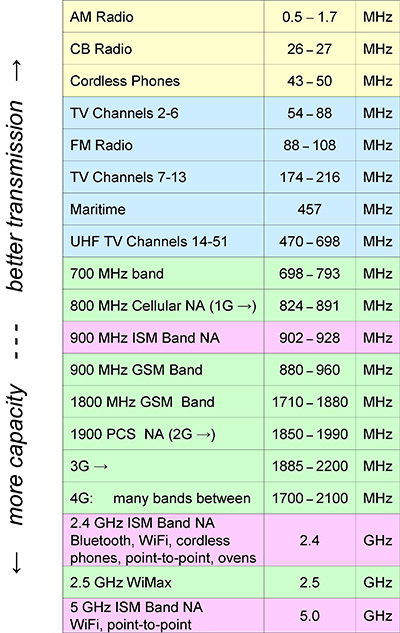
Here’s the latest tutorial: Radio Spectrum and Radio Bands

This is taken from the new Teracom Training DVD-video course
DVD6 “Understanding Wireless” course book, pages 1.06 and 1.07.

The new DVD is due out in December.

Click the diagram to go to the full tutorial.

Enjoy!

radio spectrum and radio bands

click here to go to the full tutorial

Tutorial: How to Use Cellular as Backup Internet Access When Your DSL, Cable or Fiber Internet Dies

Cellular as Emergency Internet Connection Backup

The Internet connection at your office dies. Lights on your modem are flashing in a strange pattern. You call the ISP, and they quickly diagnose that the modem power supply has failed, and they will overnight you a replacement. Presumably you are not the first person to have this problem with that modem.

So how do you continue to operate while you are waiting for the replacement power supply? It’s hard to run your business without e-mail and ordering and administration systems, which are all accessed via the Internet.

If you want availability, you need two connections to the Internet, so if one fails you are not out of business. We go over this in the lesson “Mature Competitive Carrier Network: Regional Rings, POPs and MANs”, slide 3.17 of Course 101, Telecom Datacom and Networking for Non-Engineering Professionals, and mention it in pretty much every other course.

A large business will be a station on a Metropolitan Area Network, which is a ring, meaning two connections to the Internet for that business and automatic reconfiguration in the case of one failing. But this is expensive… the second connection is not free.

Small and medium businesses usually have a single DSL or cable modem connection to the Internet. When that fails, connectivity to email, ordering and administration servers is impossible, and many businesses these days would be “dead in the water” until the ISP fixes the problem with their hardware.

Unless you have an Android smartphone, a good “data” plan and a laptop with WiFi running Windows.

The scenario described happened at our office last week. Since many of our customers might find themselves in a similar situation – even at home – I thought I’d share the quick and painless solution I came up with. Even if you’re not likely to need this solution, understanding how it works will no doubt sharpen your understanding of the devices involved and their functions.

In this tutorial, I will use the technology in our office: 16 Mb/s DSL, Android smartphone and Windows laptop. The solution is equally applicable to an Internet connection using a cable modem or if you are one of the lucky few, an Internet connection via fiber.

For the smartphone and laptop, there may be equivalent functions on Apple products, but as I am allergic to Apples, we don’t have any in the office. I’m posting this tutorial on our Facebook page, our Google+ page, or our blog; I invite someone better able to tolerate Apple products to leave a comment whether and how the iPhone and MacBook can perform the required functions.

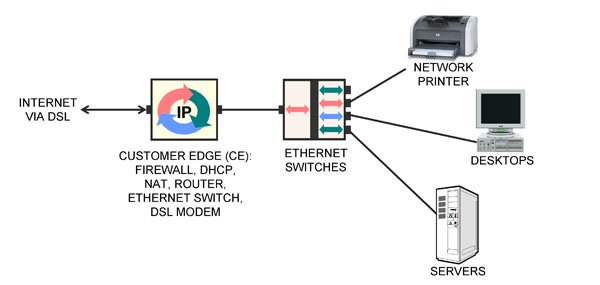
Figure 1: Normal network setup

Figure 1  illustrates the normal network setup in our office, a typical configuration for networking at a small or medium business. On the left is the access circuit to the Internet Service Provider (ISP), terminating on a modem in our office.

The modem is contained in a box that also includes a computer and an Ethernet switch. This box is more properly called the Customer Edge (CE).

The computer in the CE runs many different computer programs performing various functions: Stateful Packet Inspection firewall, DHCP server offering private IP addresses to the computers in-building, DHCP client obtaining a public IP address from the ISP, a Network Address Translation function between the two, routing, port forwarding and more.

In-building is a collection of desktop computers, servers and network printers. These are connected with Category 5e LAN cables to Gigabit Ethernet LAN switches, one of which is also connected to the CE.

When a desktop computer is restarted, its DHCP client obtains a private IP address and Domain Name Server (DNS) address from the DHCP server in the CE. The private address of the CE is configured as the “default gateway” for the desktop by Windows.

When a desktop computer wants to communicate with a server over the Internet, it looks up the server’s numeric IP address via the DNS, then creates a packet from the desktop to the Internet server and transmits it to its default gateway, the CE.

The NAT function in the CE changes the addresses on the packet to be from the CE to the Internet server and forwards the packet to the ISP via the modem and access circuit. The response from the Internet server is relayed to the CE, where the NAT changes the destination address on the return packet to be the desktop’s private address and relays it to the desktop.

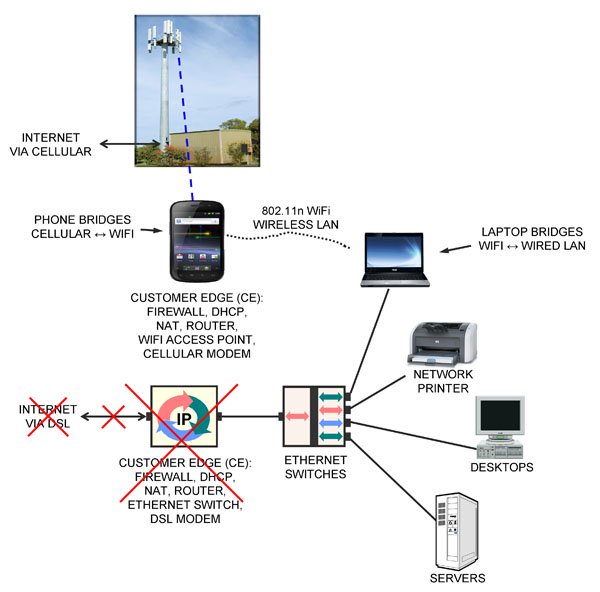
The solution for restoring Internet access after the CE died is illustrated below.

Figure 2 Restored Internet Access via Cellular

An Android smartphone and a laptop running Windows were used to restore connectivity to the Internet without making any changes to the desktops, servers or network printers.

First, I took my Samsung/Google Nexus smartphone running Android out of my pocket and plugged in the charger.

Then on its menu under Settings > more > Tethering & portable hotspot > Set up Wi-Fi hotspot, I entered a Network SSID (“TERACOM”) and a password, clicked Save, then clicked Portable Wi-Fi hotspot to turn it on.

The smartphone is now acting as a wireless LAN Access Point, just like any other WiFi AP at Starbucks, in the airport or in your home.

At this point, the smartphone is the CE device, performing all of the same functions that the DSL CE device had been before it died: firewall, DHCP client to get a public IP address from the ISP (now via cellular), DHCP server to assign private IP addresses to any clients that wanted to connect (now via WiFi), NAT to translate between the two and router to forward packets.

Just as the DSL CE equipment “bridged” or connected the DSL modem on the ISP side to the Ethernet LAN in-building, allowing all the devices on the LAN to send and receive packets to/from the Internet via DSL, the smartphone “bridges” or connects the cellular modem on the ISP side to the WiFi wireless Ethernet LAN in-building, allowing all the devices on the wireless LAN to send and receive packets to/from the Internet via cellular radio.

The remaining problem was that none of the desktops or servers had wireless LAN cards in them, so they could not connect to the smartphone AP and hence the smartphone’s cellular Internet connection.

What was needed was a device to “bridge” or connect the wired LAN to the wireless LAN in-building. By definition, this device would need two LAN interfaces: a physical Ethernet jack to plug into the wired LAN, plus a wireless LAN capability.

Looking around the office, I spotted two devices that fit this description. One of them was my laptop, with both a LAN jack and wireless LAN.

I fired up the laptop, plugged it into an Ethernet switch with a LAN cable, and in the Network and Sharing Center, clicked Change Adapter Settings to get to the Network Connections screen that showed the two LAN interfaces.

I enabled both the wired and wireless LAN interfaces. Then right-clicking the Wireless Network Connection icon, selected the TERACOM wireless network and entered the password.

Once that was successfully connected, I selected the two adapters in the Network Connections screen, right-clicked and chose “Bridge Connections”. A message saying “Please wait while Windows bridges the connections” appeared, then an icon called “Network Bridge” appeared, and after a few seconds, “TERACOM” appeared as well.

My laptop was now acting as an Ethernet switch, connecting the wired LAN to the smartphone’s wireless LAN.

Each of the desktops, servers and network printers in the office had to be rebooted so they would run their DHCP client again, obtaining a private IP address and DNS address from the smartphone AP, and be configured so the smartphone was the “default gateway” in Windows.

After rebooting my desktop computer, it had Internet access over the wired LAN, through the wired Ethernet switch to my laptop, to the smartphone via WiFi then to the ISP over cellular.

After rebooting the other desktops and servers, all had Internet access again, with no changes to the configuration of the desktops or servers.

This took about 20 minutes to get up and running, and we were back in business. Running a bandwidth test on speedtest.net, I found we had exactly 5 Mb/s connection to the Internet via cellular.

Obviously my cellular service provider limited the connection to 5 Mb/s in software – but who’s complaining? 5 Mb/s is more than three times as fast as a T1, which cost $20,000 per month when I first started in this business 20 years ago.

I hope you found this tutorial useful, either as a template for your own emergency backup Internet connection, or simply as a way of better understanding the devices, their functions and relationships.– EC

Note 1: You must verify your billing plan for “data” on your cellular contract before doing this. I have 6 GB included, which means basically unlimited, and that includes the WiFi hotspot traffic. Make sure you have something similar, to avoid receiving a bill for $10,000 for casual “data” usage.

Note 2: As always, this tutorial is provided as general background information only. We do not guarantee it will work for you. Each situation is unique and requires professional advice to identify and resolve issues including but not limited to performance and security. This tutorial is not professional advice. But I hope you have found it valuable.

Note 3: I might have been able to implement this without the laptop. If you’d like to know that, or what was the other device I could have used to bridge the wired and wireless LAN in-building, or suggest how this could be done with Apple products, please leave a comment.

802.11g Wireless LAN (WiFi) base station on my new Samsung Galaxy Android phone

Waiting for a flight at the airport. Time on my hands, I try out a feature included with the Android operating system on my new Samsung Galaxy: create an 802.11g Wireless LAN (WiFi) base station on the phone.

This WiFi network is automatically bridged inside the phone to the Internet connection provided by the cellular carrier.

Easy step-by-step instructions were included on the setup screen.

Fired up my laptop and found the WiFi network and connected no problem.

In fact, I sent a post to Google’s servers over the very link!

Ain’t technology wonderful.

Bonus: your car can now be a WiFi hotspot! You could even get a WiFi hotsopt logo sticker and put it on your back window, like Greyhound… On a long car trip with my family, all of whom have WiFi enabled iPhones, iPods, DSs etc. etc., I can tell them the WiFi password, and they can share my internet connection.

Double bonus: If the kids start squabbling, I can threaten to turn it off!

btw, I have 6 GB/month in my plan, so not so worried about usage-based pricing for the connection. Best check your billing plan before trying it.

EC

Wireless Telecommunications – new Online Course released

We’re pleased to announce the release of another online course: Wireless Telecommunications.

In this course, we cover wireless, concentrating mostly on mobile communications.

We’ll cover the principles of operation, jargon and buzzwords in the mobility business, the idea behind cellular radio systems, and explain the different spectrum-sharing technologies, including 1G analog FDMA, 2G TDMA/GSM vs. CDMA, 3G 1X vs. UMTS CDMA and 4G OFDMA.

We’ll conclude with a lesson on 802.11 wireless LANs (Wi-Fi) and a lesson on satellite communications.

Lessons in this module

1. Module Introduction – Wireless Communications
watch intro now (free)

2. Mobile Network Components, Jargon and Basic Operation

3. Cellular Principles and AMPS (1G)

4. 2G: Digital Radio – Voice Communications

5. Digital Cellular: Data Communications

6. Spectrum-Sharing Technologies: FDMA, TDMA, CDMA, OFDM

7. 3G Cellular: CDMA watch now (free)

8. 4G Mobile Cellular: LTE

9. 802.11 Wireless LANs – WiFi

10. Communication Satellites